Road Bike Derailleur Install

How To Adjust Your Front Derailleur In 5 Easy Steps Bike Repair Bicycle Maintenance Bicycle Mechanics

How To Install And Adjust Your Front Derailleur Singletracks Mountain Bike News Bike Riding Benefits Bicycle Maintenance Comfort Bike

How To Adjust Your Front Derailleur In 5 Easy Steps Bike Repair Bicycle Maintenance Bike

How To Adjust Your Rear Derailleur In 5 Easy Steps Cycling Bikes Bike Repair Mountain Biking

How To Adjust Your Front Derailleur In 5 Easy Steps Bike Repair Bicycle Camping Road Bicycle Bikes

Bicycles X2f Maintenance And Repair X2f Derailleurs X2f Rear Derailleur Adjustment Wikibooks Open Books For Bicycle Maintenance Bike Repair Bicycle Gear
Fitting guide shimano 11 40 rear cassette road bike duration.
Road bike derailleur install. The derailleur is moved by tightening or relaxing the cable tension. Rear derailleur installation before installing the new rear derailleur apply some waterproof grease to the mounting bolt. When the derailleur cage sits too far above the chainring this can cause the bike to shift poorly. Shimano road bike derailleur compatibility.
Make sure your derailleur sits at the correct height. Installing long cage rear derailleur and setting limit screws and b screw. Replacing and adjusting your rear derailleur to make sure that your gears are shifting correctly is a relatively easy task when you know how. Installing a derailleur from sram or box components follows a very similar method.
This how to can be used on road bikes with shimano rear derailleurs whether you are installing a new derailleur or adjusting your dysfunctional derailleur. After reading this mtb how to you should be an expert on how to install and set up your rear derailleur here we are going to be installing a shimano xt m8000 rear derailleur for a 1x11 drivetrain. All 11 speed shimano road components are inter compatible you could for example use a dura ace 9100 derailleur with a pair of 105 7000 shifters. The highest gear smallest sprocket on the rear derailleur is actually the point of lowest cable tension meaning the derailleur is doing the least work and is thus easiest to adjust.
Follow gcn on y. The derailleur should fall around 1 to 3 millimetres 0 039 to 0 118 in above the large chain ring. Then thread it part way into the derailleur hanger and rotate it clockwise to make sure the b screw or tab is sitting behind the flat on the back of the hanger. The derailleur is connected to the shift lever by a steel cable.
Replacing a front derailleur is a relatively uncommon task in the workshop but it s also thankfully quite simple. Free to cycle 23 016 views.

How To Adjust A Rear Bicycle Derailleur Bike Ride Bike Repair Bicycle

Gear Derailleur Diagram Google Search Bike Illustration Bike Mechanics Bicycle Maintenance

How To Adjust Shimano Di2 Rear Derailleurs Shimano Cyclery Adjustable

How To Install And Adjust Your Front Derailleur Singletracks Mountain Bike News Mountain Bike Equipment Bike News Mountain Biking

Front Derailleur Adjustment Bike Repair Bicycle Maintenance Bike Mechanics

Adjust A Front Bicycle Derailleur Bike Repair Stand Bike Repair Bicycle

Remove Install A Bicycle Chain Youtube Bike Chain Bike Repair Bicycle Chains

Front Derailleur Adjustment Park Tool Park Tool Bicycle Mechanics Adjustable

Front Derailleur Adjustment Bicycle Maintenance Bike Bicycle

What Are Gears And What Do They Do Lesson Bike Gear Bike Ride Bicycle Maintenance

How To Adjust Sram Yaw Front Derailleurs Bike Rider Cyclery Bike

Basic Bicycle Anatomy 101 Back End Trek Store South Carolina And The Great Escape In Greenville Spartanburg And Ander Bicycle Bike Frame The Great Escape

How To Remove And Install Bicycle Wheels Bike Repair Stand Bike Repair

Watch How To Install A Rear Derailleur Mtb Maintenance Singletracks Mountain Bike News Bike Repair Repair Bike Design

How To Adjust Your Rear Derailer In 30 Secs Bike Ride Bike Bike Repair

Rear Derailleur Adjustment Push Bikes Park Tool Bicycle Maintenance

How To Build A Bike Part 7 Of 12 Youtube Derailleur And Shift Housing Installation And Routing Bike Repair Build A Bike Bicycle Maintenance

Front Derailleur Cable Replacement Installation Bike Road Bike
1

How To Install A Shimano Road Chain Shimano Cyclery Bike

How To Install And Adjust Your Front Derailleur Singletracks Mountain Bike News Bike News Mountain Biking Mountain Bike Parts

Are You Making These Two Common Mistakes Adjusting Shimano Front Derailleurs Road Bike Rider Cycling Site In 2020 Bike Rider Cycling Site Shimano

How To Install And Adjust A Rear Derailleur Http Thecyclingbug Co Uk How To B Videos Archive 2015 05 05 How To Install And Cycling Videos Installation Bike

Technical Faq Shimano 11 Speed Front Derailleur Cable Setup Velonews Com Shimano Setup Competitive Cycling

Video Tech Tuesday Installing Derailleurs Singletracks Mountain Bike News Repair And Maintenance Mountain Biking Bike News

Pin On Bicycle Derailleur

Park Tool Repair Help All Videos Youtube Park Tool Bicycle Handlebars Bicycle Tools

Pin By Performance Bicycle On Bicycle Maintenance Diy Bicycle Bicycle Maintenance Bike

How To Adjust A Front Derailleur Road Bike Diy Bike Repair Bike Repair Biking Diy Road Bike Accessories

How To Remove And Install A Wheel On A Bicycle Touring Bicycles How To Remove Bicycle

Large Bicycle Bag Bike Storage Front Frame Tube Triangle Bag High Capacity Waterproof Cycling Firmly Install Bike Accessories Bicycle Bag Bike Bag Cycling Bag

How To Adjust Your Rear Derailleur Bicycle Tutor Video Bike Repair Bike Bicycle

Rotor Disc Service And Installation Bike Repair Bicycle Safety Bicycle Maintenance

How To Adjust Your Saddle And Riding Posture To Make Your Current Bike Seat More Comfortable

Rivnut Bottle Cage Mounts Installation And Test Bikepacking Com Bike Frame Bicycle Gear Bottle

Best Mountain Bike Derailleurs Of 2020 Mountain Biking Gear Best Mountain Bikes Mountain Biking

Shimano 7 Speed Group Set Mountain Bike Shifter Lever Stef51 3x7speedfront Derailleur Fdtx50rear Derailleur Rdty300 Want Addition Bike Bicycle Bike Bicycle

24mm Mountain Bike Bicycle Flywheel Demolition Installation Remover Repair 12 Teeth Sleeve Socket Rotating Flywheel Repair Tool Bicycle Bike Bike Repair Repair

Adjusting Mechanical Disc Brakes Montague Bikes Bike Brakes Folding Bike

Disc Brake Rotor Removal Installation Bicycle Maintenance Bike Park Tool
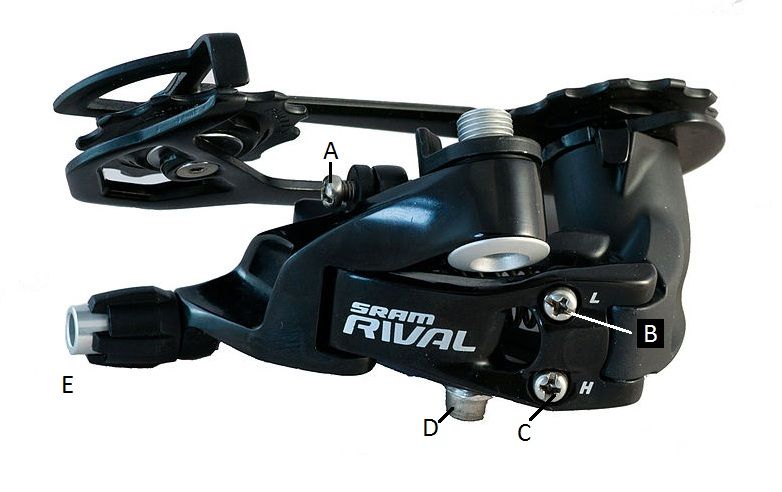
Figure 3 Typical Sram Derailleur Adjustment Points A The B Adjustment B And C The Limit Adjustments Usua Bike Repair Bicycle Maintenance Bike Mechanics

Front Derailleur Adjustment Park Tool Bike Repair Bicycle Gear Bicycle Mechanics

